


Understanding exposure—part 3/3
The next element in understanding exposure is shutter speed. Also referred to as exposure time, it is measured by the length of time the shutter remains open. The shutter is like a curtain in front of the camera’s sensor and depending on how fast it opens will determine the amount of light is captured by the sensor. The longer the shutter remains open, the more light is captured and vice versa.
Shutter speed is measured in milliseconds. A very fast shutter could be 1/1000s and a slow shutter could be 1/4s. A fast shutter will be useful to freeze motion; for example, a moving object such as a car. A slow shutter is used to capture movement like a waterfall that will produce a milky effect to the water movement.
Here’s a guide of shutter speed and how it can be applied:
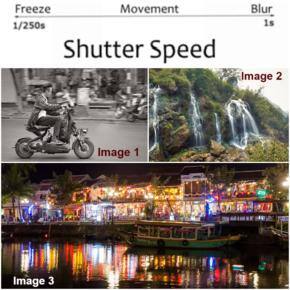
Panning is a method of focusing on an object while following its movement. So in the image 1 , I started by focus when the bike is at my 10 o’clock and followed it until it is right in front of me.
This will result in the object looking sharp and the background blurry. This takes some experimenting to determine the speed of the object. Try to photograph with and without panning and see the difference.
To take milky water photos ( see Image 2), you’ll need to use a tripod, as any handheld at 1s will produce blurry shots. To be sure, a remote trigger for your camera will be handy or you can set your camera to delay trigger by 2s. Check your camera manual on how to do this.
Long exposure is also used in night photography where you want to capture the surrounding landscape. It’s common to use a shutter speed of 1s and above when photographing the landscape. In the image 3, the shutter was 2s. Tripod is a must.
| Shutter speed | Good for |
| 1/1000s | Freeze fast-moving cars |
| 1/500s | Freeze athletes during a game |
| 1/250s | Freeze someone walking |
| 1/125s | Panning fast moving vehicle |
TRY
To determine what shutter speed to use, first, determine what kind of effect you would like to achieve. Then it’s a matter of trying out different shutter speed, and don’t worry if you don’t get it right the first time round.
TIPS
Generally, if you are photographing indoors while holding your camera, you do not want to go below 1/60s, as that can cause blurry shots. I normally keep mine to 1/125s. It also depends on how steady your hands are.
PHOTO REVIEW
We invite readers to submit their photos for a constructive review. I will highlight the positive attributes and suggest what can be improved. Due to limited space, I will only review and post three images in my next article. Please send your photos to jeff@studio81.co.nz. We have some sponsored gifts from Auckland Camera for the images that we publish for review.
About the author
Jeffery is the owner and photographer at STUDIO81 photography and is located in Newmarket and East Tamaki. STUDIO81 is one of Auckland’s leading portrait photography studio and specialises in modern glamour transformation. Jeffery is an award winning photographer and NZIPP Master of Photography. You can view his latest works on Instagram at STUDIO81NZ or Facebook at STUDIO81
The next element in understanding exposure is shutter speed. Also referred to as exposure time, it is measured by the length of time the shutter remains open. The shutter is like a curtain in front of the camera’s sensor and depending on how fast it opens will determine the amount of light is...
The next element in understanding exposure is shutter speed. Also referred to as exposure time, it is measured by the length of time the shutter remains open. The shutter is like a curtain in front of the camera’s sensor and depending on how fast it opens will determine the amount of light is captured by the sensor. The longer the shutter remains open, the more light is captured and vice versa.
Shutter speed is measured in milliseconds. A very fast shutter could be 1/1000s and a slow shutter could be 1/4s. A fast shutter will be useful to freeze motion; for example, a moving object such as a car. A slow shutter is used to capture movement like a waterfall that will produce a milky effect to the water movement.
Here’s a guide of shutter speed and how it can be applied:
Panning is a method of focusing on an object while following its movement. So in the image 1 , I started by focus when the bike is at my 10 o’clock and followed it until it is right in front of me.
This will result in the object looking sharp and the background blurry. This takes some experimenting to determine the speed of the object. Try to photograph with and without panning and see the difference.
To take milky water photos ( see Image 2), you’ll need to use a tripod, as any handheld at 1s will produce blurry shots. To be sure, a remote trigger for your camera will be handy or you can set your camera to delay trigger by 2s. Check your camera manual on how to do this.
Long exposure is also used in night photography where you want to capture the surrounding landscape. It’s common to use a shutter speed of 1s and above when photographing the landscape. In the image 3, the shutter was 2s. Tripod is a must.
| Shutter speed | Good for |
| 1/1000s | Freeze fast-moving cars |
| 1/500s | Freeze athletes during a game |
| 1/250s | Freeze someone walking |
| 1/125s | Panning fast moving vehicle |
TRY
To determine what shutter speed to use, first, determine what kind of effect you would like to achieve. Then it’s a matter of trying out different shutter speed, and don’t worry if you don’t get it right the first time round.
TIPS
Generally, if you are photographing indoors while holding your camera, you do not want to go below 1/60s, as that can cause blurry shots. I normally keep mine to 1/125s. It also depends on how steady your hands are.
PHOTO REVIEW
We invite readers to submit their photos for a constructive review. I will highlight the positive attributes and suggest what can be improved. Due to limited space, I will only review and post three images in my next article. Please send your photos to jeff@studio81.co.nz. We have some sponsored gifts from Auckland Camera for the images that we publish for review.
About the author
Jeffery is the owner and photographer at STUDIO81 photography and is located in Newmarket and East Tamaki. STUDIO81 is one of Auckland’s leading portrait photography studio and specialises in modern glamour transformation. Jeffery is an award winning photographer and NZIPP Master of Photography. You can view his latest works on Instagram at STUDIO81NZ or Facebook at STUDIO81


Related Posts
ISSUE


Leave a Comment